Hello and Welcome to my Blog ~ I love art of all kinds. Two of my favorites are polymer clay and paper art. I have shops on Etsy that feature both of my passions. I also love writing my blog and finding artists that have a passion for their craft and feature them. I hope your day is filled with sunshine, laughter and loads of creativity.


Monday, January 31, 2011

Unique Jewelry Pieces

One might wonder where the word Jewelry came from. Well, here is what the encyclopedia Wikipedia tells us:The word jewellery or Jewelry is derived from the word jewel, which was Anglicized from the Old French "jouel" circa the 13th century. Further tracing leads back to the Latin word "jocale", meaning plaything. Jewellery is one of the oldest forms of body adornment and the recently-found 100,000-year-old beads made from Nassarius shells are thought to be the oldest known jewellery
I have found some unique jewelry pieces that I thought you might enjoy along with the links to these wonderful Polymer Clay Artists.


Cindy Lietz - This wonderful butterfly-heart pendant was featured on Cindy's blog in January 2009. The wings are fashioned from a cane giving them the look of a Monarch Butterfly. You can see more of Cindy's beautiful creations and tutorials at : http://www.beadsandbeading.com/blog/

Winged Heart Pendant


Celilne Charuau, a French Artist, created this unusual wire and polymer clay pendant. Celine has been working with polymer clay since June 2007 (per the Daily Art Muse).


24071307_m


Carly Seibel (LuBelle) created these delightful beads that are wrapped around the middle with bands of variegated gold leafing and a second strip of multi-colors on black.
You can see more of her beautiful polymer clay bead work at: http://webspace.webring.com/people/vb/bellelu/beadspage.html


LuBelle Beads-Wrapped Bead Set (37kb)

Polymer clay artist, Karen Lewis, also known as Klew, is well know for innovative bead designs. You can visit her gallery at: http://klewexpressions.com/jewelry.htm


This particular necklace caught my eye because of the beautiful colors and design.

Klew clasp necklase

This Pandora bead is created with a beautiful cane in various colors and hanging from the bead is a Chihuahua charm. The Chihuahua is all white and sits on a periwinkle heart and has a tiny butterfly in one ear whose wings match the bead. http://nanjodogz.blogspot.com/2011/01/chihuahua-polymer-clay-dog-pandora-bead.html


My Guild was fortunate to have Victoria Hughes (Tory) give a demonstration on her innovative hinging techniques with polymer clay. She was loads of fun as well as inspirational.

This beautiful piece of hers has two different hinges. You can see more of her wonderful creations at: http://www.thebeadhouse.com/Victoria.html


The cane work and innovative designs
of these Polymer Clay Artists is simply awesome.

Friday, January 21, 2011

Some Great Information!


So many Polymer Clay Artists want to know
where they can buy some of their supplies.
I have come up with a list that is sure to help.


Canes
- The Pleasant Pheasant
If you are looking for beautiful canes, I recommend The Pleasant Pheasant. Jackie's work is exceptional as you will see by visiting her Etsy Shop: http://www.etsy.com/shop/ThePleasantPheasant?section_id=6779566


Molds
- Best Flex Molds
This shop offers a large variety of molds. Penni Jo runs the shop while her husband makes the wonderful Urethane Rubber polymer clay molds which are all from Penni Jo's original sculpts. They also offer polymer clay tutorials and polymer clay classes. You can visit their shop at: http://www.bestflexiblemolds.com/


Clear Stamps - Tonja's Treasures
Every polymer clay artist needs stamps. At this time there are 75 original clear stamps available in Tonja's shop, plus she makes custom stamps The "Make your own design" stamp or your very own "Signature Stamp". You can visit her shop at: http://www.etsy.com/shop/tonjastreasures


Texture sheets
- Ornamentalelements
This shop offers a variety of 13 texture sheets for one low price and they come in many colors. you can see these textured sheets at: http://www.etsy.com/listing/54673623/set-of-13-texture-sheets.

Jewelry Supply: Imjewelee
Julee is the designer and creator of the XO Brand™ Jewelry Finding products. As of this time she has sold a whopping 11,320 items. You can visit her shop at: http://www.etsy.com/shop/Imjewelee?ref=pr_profile


I think you'll love reading about the testing that Garie Sims did on polymer clay.
I found it to be very informative and it may help you pick out the type
of clay you want to use on a project.


Compression Test: by Garie Sims

Which types of polymer clay are the strongest? Garie did tension, compression and flexibility tests on the different types of polymer clay and came out with some astonishing results.
You can see his tests and results at: http://www.garieinternational.com.sg/clay/shop/tension_test.htm


A book of Masks: by Sarajane Helm

Last of all, I want to tell you about Sarajane Helm's Polymer Clay "Mask" Book that has just been published. There are so many wonderful pictures of masks all created with polymer clay. I was in awe of the creativity of the artists and I think Sarajane did a fantastic job putting together this awesome book. It is on sale at Amazon and you can see it by clicking on the following link:
http://www.amazon.com/dp/0980031222?tag=sarajanspolymerc&camp=213381&creative=
390973&linkCode=as4&creativeASIN=0980031222&adid=1MF4QPXJ3CP62BKYNWMS&


Happy Claying!


Wednesday, January 12, 2011

Pretty in Pink

Picked by mstp

I was very excited to create a 'Pretty in Pink' treasury.
It reminds me of my Granddaughter, Melissa. There was no tomboy to be found in that child, she always loved dressing up. Her favorite movie was 'The Wizard of Oz' She would dress up like Dorothy and carry around a basket with her little stuffed puppy, Toto. She would watch that movie over and over and over. One day when she was out shopping with her mom, someone asked her name. She was quick to respond that she was Dorothy Gale. I asked Trina, " Who on earth is Dorothy Gale ". I had never heard Dorothy's last name before, I guess I hadn't watched the movie enough to realize Dorothy Gale was the one from Kansas.

~*~*~*~*~*~*~


Ellie the Elephant


I had created an elephant for Melissa which I pictured in my


last post. Well, he was quite popular and a friend of mine, Anita from Polymer Clay Central, who is a wonderful clay artist told me I should make an Ellie, So Thank you Anita. Here is Ellie with her copper colored ears and snazzy bow draped upon her back.


I am going to include her in my Etsy shop and if she sells right away, I may just go into the Elephant selling business and name it Elephants Galore. (LOL)


Monday, January 10, 2011

Elephants Galore

I made this little Elephant for my Granddaughter. He turned out kind of cute with his big ears and long trunk. I wanted to do a little something different with the ears and thought some cane work, (which I am not very good at, but I'm working on it) would be fun to do. I used copper Pearl-X over the purple cane and that really made them stand out, as though they weren't standing out enough in the first place! (LOL)

Well, she loved the little fellow and set him on her mantle. There he stands very majestically (although he is only two and a half inches tall) guarding over her living room.

My husband and I were always big fans of elephants and there are quite a few in our family room. As you can see, even the lamps have elephants.

The house has an atrium and the windows of this wonderful space look out onto the kitchen, living room, dining room and family room. When we first bought this house, we wanted to have something big in there as the atrium itself is 8 feet by 12 feet. Well, one day when I was shopping with my granddaughter and grandson we spotted this fantastic elephant fountain. It was meant for the outside, because it is made of concrete, but as soon as my Granddaughter (who was nine at the time) saw it, she loved it and promptly named him Squirty. He sits proudly in the center of the atrium squirting water and keeping the plants in there extremely happy.

Sweetpea, (our cat who has since gone on to mouse heaven) would stare into the Atrium for hours on end. She must have thought that she was actually looking outside and would wait patiently for a bird or squirrel to suddenly appear.
This picture of the atrium was taken from the kitchen.

I created this little bird using the same colored clay and pearl-X that I used on the elephants ears. I decided it would make a cute little plant stake for one of the plants in the atrium.
In closing, I must tell you I adore this space, it becomes quite magical in the evening when the only light in the house is coming from there.

Monday, January 3, 2011

Troubles with my Clay

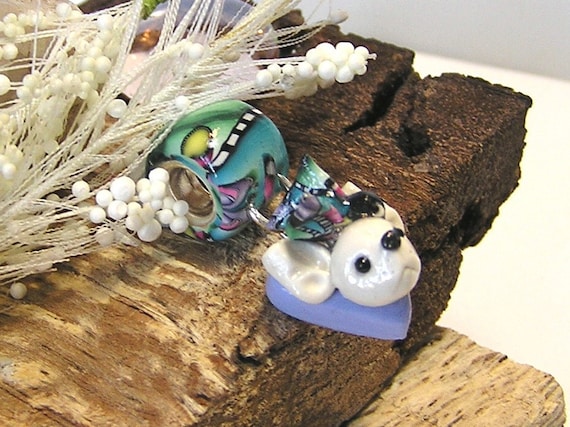
I created this masked face today. It took me what seemed like hours to condition the clay that I used for the face because it was so hard and crumbly. I have one of those big blocks of clay and for reasons beyond my imagination it hardened since I used it last. I didn't want to throw it away, what a waste that would have been, plus the fact I would have had to run to the store to buy another. There is nothing more exasperating than to delve into a project and have to run to the store or spend more time conditioning the clay than actually creating something with it. Okay, should I flip a coin ? Heads I go to the store or tails I use the crumbly clay. Not really wanting to get dressed, get in the car, ride the whole mile to the store (okay now you're laughing and so am I. I could have gone to the store and been back with the new clay in record time.) Lets get back to my problem clay.


One thing I have that helped me condition this clay is Quick-Mix, but it still took me a lot longer than I would have liked to make it pliable. When I finally had it conditioned and the face formed, I was unhappy with how lumpy it was. I don't mean big lumps, but kind of wavy lumps that I was having trouble smoothing out. (It's hard to imagine, especially with all the work I put into it, but maybe the clay wasn't quite conditioned enough) It was then that I remembered I had bought the Isoprophyl Alcohol just for times like this. I dipped my fingers into the alcohol and lightly rubbed it across the face, nervous as to what it would do. WOW, was I amazed at what had just happened. I had never used the alcohol before, but had heard that it works. The lumps began to disappear. As you can see by the picture, the face turned out very smooth.


After I finished this mask, I decided to check out the different ways to condition clay and this is what I found on the internet. I was surprised at a few of the methods being used.


How to work with Fimo Mix Quick

Fimo Mix Quick is an essential ingredient of any modelers "toolbox". The chemical reaction that happens between Fimo and this clear and slightly soft product is absolutely amazing. You only need to use a very small amount of mix quick, say 1/8th of the amount of Fimo being used to achieve the desired effect. You simply take the Fimo and Mix Quick and knead them together. Keep turning and stretching the resultant combined material until it suddenly softens in your hand and the Mix Quick has disappeared leaving your Fimo once again smooth, elastic and usable.


It is important that when you choose your blocks of Fimo at point of sale that you gently press the block to make sure that you are not purchasing something that has been incorrectly stored. If you see any cracks appear do not buy that block but show it to the shop keeper, as it may have been overheated while on display.

Conditioning large amounts of clay can take enough time and effort to be annoying, particularly if you have arthritis in the hands, or are using a stiff clay. There are a number of ways to make conditioning faster and less hard on the hands: Pre-warming the clay

You can start the conditioning process by putting the clay in a warm place for fifteen or twenty minutes; for example, you can stick the packages you'll be working with in your clothes (some people sit on the clay packages), or use a hot-water bottle. Warning: Excessive heat or ultraviolet light will cause the clay to start curing, making it unusable except as scrap. Don't put the clay in the sun. If you're using a heat source such as a lamp or heating pad, make sure the clay does not get much warmer than your body temperature. Chopping the clay

Many clayworkers use a food processor to chop up the clay. The small chopped bits are easier to work with than large chunks, and the friction of the blade warms the clay. After chopping the clay, you dump out the chopped bits, press them together with your fingers, and continue the conditioning as described above. Adding softening agents to the clay

There are a number of things you can add to polymer clay to make it softer:
Eberhard-Faber (makers of Fimo) make an item called "Mix-Quick", which is a solid block of extra plasticizer; you can add Mix-Quick to your clay up to a third of the total.
Sculpey Diluent is a liquid that does essentially the same thing, softening clay when you add a few drops.
If you're using a stiff clay, you can add as much as a third of Sculpey transparent to soften the clay without changing the color.
You can also mix a few drops of mineral oil or a dab of petroleum jelly into polymer clay. (Add only a small amount; it's easy to overestimate how much you need.)

Thank heavens, I only have a small amount of the crumbly clay left, which I will use as soon as my hands are ready for another workout.

Saturday, January 1, 2011

A Day in Historic Grapevine Texas

Charlie, Tina, Little C and I visited Old Historic Grapevine in Grapevine Texas which is about a 40 minute ride from Plano. It was a beautiful sunny day to visit and the weather was so nice. It was actually in the high 60s.

We decided to visit Vetro first, which is a beautiful shop full of blown glass
creations that are made right on site.

Behind the shop is
this large room where bleachers are set up so you can sit and watch the Artisans at work . (I took these pictures from the bleachers)

For $25.00 you can have them make one of these beautiful Christmas bulbs.

A couple with their little boy did just that. The little guy picked ou
t the colors for his bulb and he watched intently as the Artisan went about making his bulb. It was fascinating to watch. This picture shows the Artisan rolling the hot glass that had just come out of the oven.

Next door is the r
enowned International Bronze Sculptor Archie St. Clair.


(The pictures that I had taken are of the molds that were used for these gigantic statues.)


Mr. St. Clair was born and grew up in the Australian Outback and spent much of his young life working as a stockman and a butcher. At the age of 22, St. Clair earned his pilot's license and began working as a commercial helicopter pilot. He accrued years of flight experience, but even they could not prevent the terrible helicopter accident St. Clair suffered in 1994 that left him wheelchair-bound. St. Clair spent the next three-and-a-half years not only overcoming his disability, but also discovering his talent for making clay sculptures and immersing himself in the sculpting process. Once he was able, St. Clair moved from his remote hometown in Australia to Arizona to work in the foundries. It was there that he learned the process of turning his clay masterpieces into bronze. (This is a picture of Archie taken in front of his renowned statue called the "Cunnamulla Fella" which was commissioned by the city of Cunnamulla, Queensland Australia).

The bronze
process is not an easy one to complete. St. Clair spends countless hours in his studio across from the Vintage Train Depot in downtown Grapevine transforming the clay that he makes himself into intricate (and sometimes larger than life) works of art. St. Clair says that this first step is the one that truly requires his artistic touch: he can teach anyone to make molds and pour bronze, but only an artist can capture the fine details that make an inanimate figure come alive.

Once a clay sculpture is complete, St. Clair and his team use rubber, plaster, wax, and ceramic to make molds of all the sculpture's different sections. These molds end up in the adjoining foundry, where they are filled with molten bronze. When the bronze has cooled and hardened, the ceramic is methodically chipped away and what's left behind is a jigsaw puzzle of pieces that St. Clair welds together into one metallic monument. St. Clair applies a patina to his bronze sculptures to highlight different areas and make them even more lifelike.

The lights stay on in St. Clair's studio well into the night, but St. Clair would not have it any other way. He's committed to producing the highest quality work possible, and his dogged pursuit of perfection is evident all the way down to the stitching in his sculptures' pants. Even though St. Clair's art requires so much of his attention, he is happy to take a break to meet with visitors who stop by. He even encourages them to help him with the artistic process by carving away at the clay pieces that he's working on.

When we met with Mr. St. Clair he told us that he will be moving from Grapevine to S
t. Louis in the near future Everyone will miss him but fortunately for all the visitors he has left his mark in this historic old town for all to see. (There are statues throughout the town that were created by Mr. St. Clair) Don't you just love the statue of a dog in the bed of his old truck.

Charlie loved climbing up on the box car of an old train w
hich was parked right across the street from the shops. He could have stayed there for hours playing on the train, but we were all getting pretty hungry and decided to visit our favorite pizza shop. We always go to this Pizza shop because it is by far the best we have had here in Texas. I grew up having pizza in Connecticut and there really is nothing to compare that with what Texas has to offer, but this pizza ranks up there pretty high in my opinion.

After, we had fun walking around the town and seeing all the Christmas decorations. Here is Little C peering over Santa's hat. It almost looks like Santa is holding him there.

I took pictures of a couple of the little Christmas scenes. Charlie lov
ed seeing all of them. One of the scenes had all of Santa's reindeer with each of their names written below them. What was strange is that Donner was named Donder. We looked it up and low and behold Donder was his name in the original poem.

The finale was something
everyone should experience. It's a Christmas musical light show that takes place at the town square. People line the street watching this wonderful event. I must say that our day in Historic Grapevine was the perfect ending to this Christmas Season.