Hello and Welcome to my Blog ~ I love art of all kinds. Two of my favorites are polymer clay and paper art. I have shops on Etsy that feature both of my passions. I also love writing my blog and finding artists that have a passion for their craft and feature them. I hope your day is filled with sunshine, laughter and loads of creativity.


Saturday, December 25, 2010

Our Traditional Christmas Eve Dinner.


Twas the Night before Christmas and the wonderful aromas of our traditional Italian dinner were permeating throughout the house making us all anxious to have this fabulous meal. This Christmas Eve dinner has been a tradition in my husband's family going back for generations.

Let's begin with the scene this morning:

When I came into the kitchen I was surprised to see the bread dough that only covered the bottom of this large bowl last night had mushroomed into a gigantic ball. I added extra dough this year and didn't think about the consequences. I was extremely happy that I had it covered with plastic wrap, otherwise it would have overflowed onto the counter top. Oh My, what a mess that would have made.


Fried dough is one of my families favorites. It is so yummy just plain or dipped in


sugar. It takes awhile to fry them, but well worth the effort. Of course a lot of them are eaten right out of the frying pan under the notion that they might not be quite done inside.


(UMM... I think I just gained another five pounds)


My son Michael, who is a fantastic cook, has added baking to his repertoire.


He made the most delicious Mexican Wedding Cookies also know as Russian Tea Cookies. I had never had these cookies and was delighted with the outcome. When he added the finishing touches, I thought they looked like little snow balls. Talk about delicious, they had a wonderfully nutty, buttery flavor and the confectioners sugar not only made them look so pretty but added to the flavor as well.


NOW, ONTO THE ENTREE..
Our tradition consists of two seafood dishes, a spaghetti dish with marinara


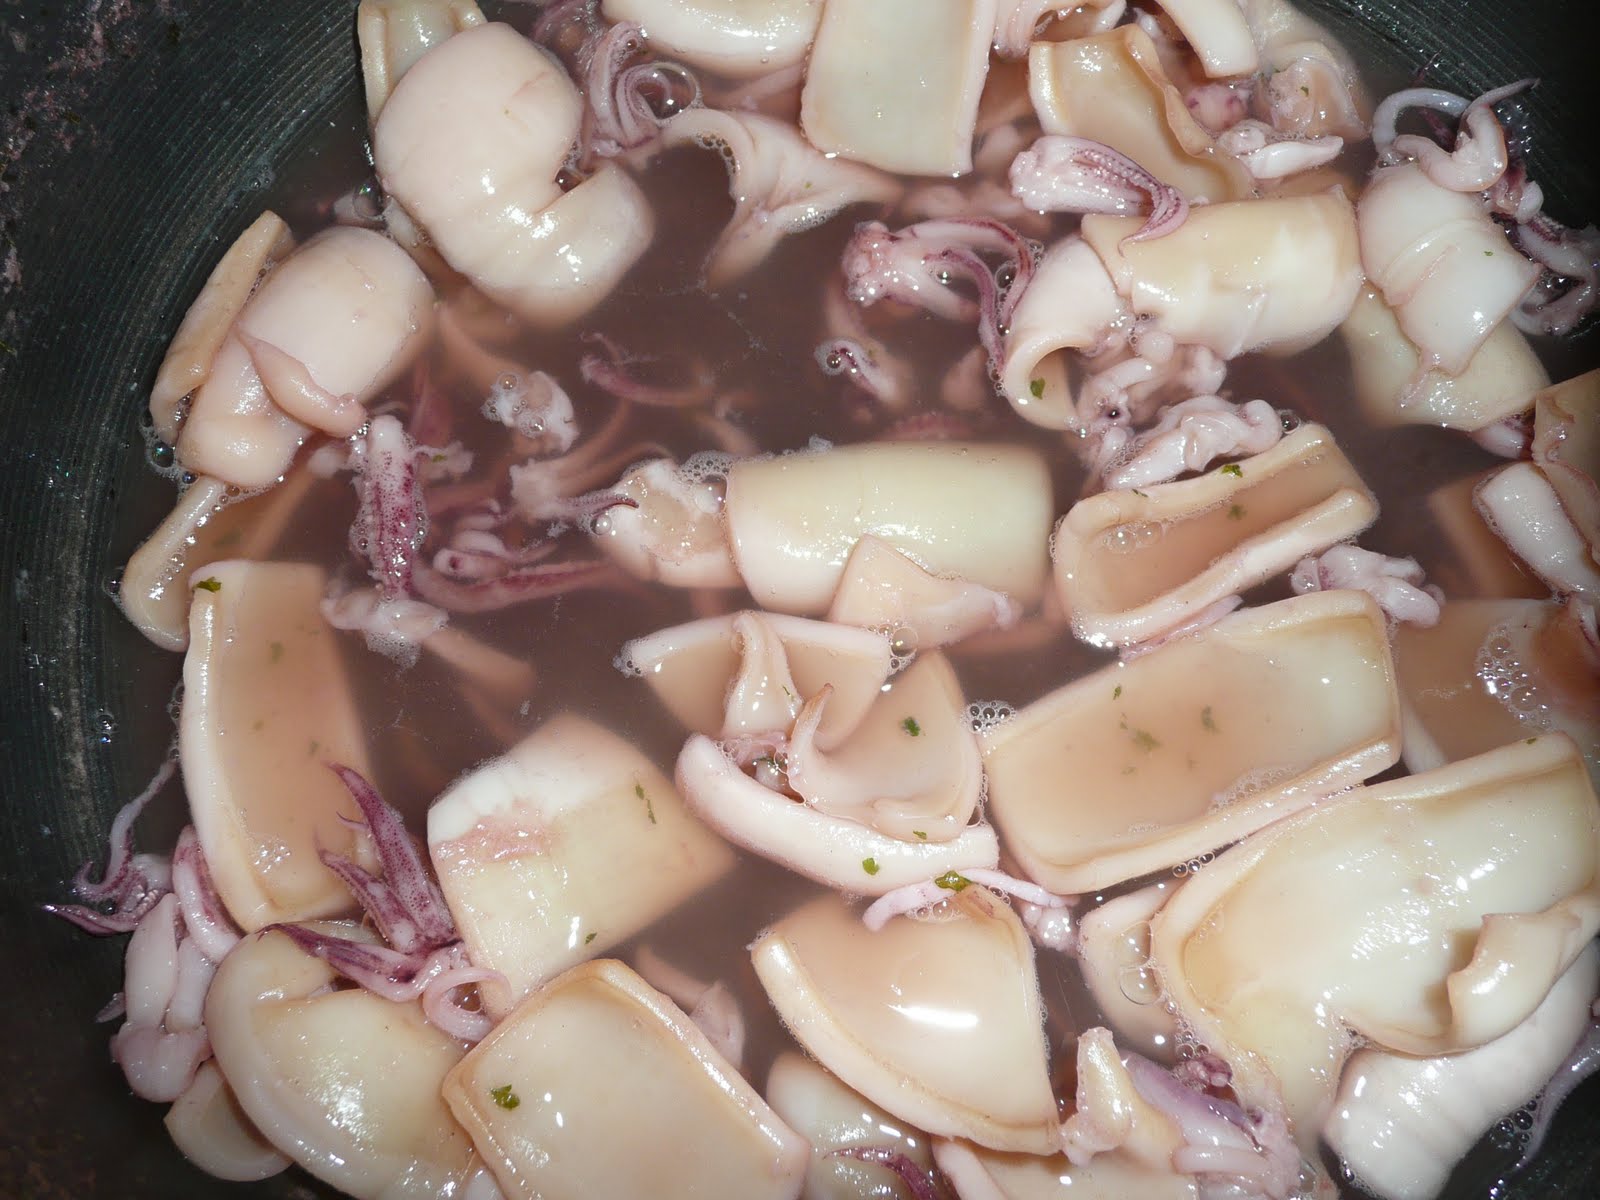
suce and fried smelts. The first one is made with calamari. It took me years before I would try this wonderful dish, but when I did, I wondered what on earth took me so long. I look forward to having this every year. This picture of the calamari shows it still in the pot that it was cooked in. It is mixed into a bowl of spaghetti for the final presentation to the meal.

The second one is an Anchovy sauce which is also mixed into a bowl of spaghetti. My sons love this dish and it is so easy to prepare.


The smelts, however, are quite a process. First the cleaning which takes awhile, because we had four pounds of these little beauties. Then there is the filleting, battering and then frying them to a golden brown. Everyone loves them. They are salty, crispy and downright delicious. My son's, Chef Michael along with his sous chef, Charlie, were in charge and I must tell you, they did an outstanding job.

The centerpiece for the table was given to my husband and me from his parents years ago.This is the first time that I have used it as a centerpiece and thought it looked beautiful with the white dishes.


My four year old Grandson said Grace, then sang a little prayer he learned at his pre-school. It was incredibly sweet.

My table was blessed with the presence of Charlie, Tina, Little C, Michael, his friend Joey and her sons Caden and Ethan. I wished that Trina, George, and my Grandchildren George and Melissa could have been with us. It certainly would have made the day complete.

Wednesday, December 15, 2010

Setting up the Christmas Tree

I set up my Christmas tree today. I have one of those perfect, pre-lit, in the box, trees that comes in three pieces. I had it up in record time and all decorated, then I turned on the lights. Okay, why is the bottom section lit up and not the top two. It doesn't take a Rocket Scientist to figure this one out, but one sure could have helped. I finally realized that each section had to be connected. DUH!

Did you notice that my beautiful Angel looks a bit tipsy up there on the tree top. She either had too much wine while I was decorating the tree or she's afraid of heights and is about to fall off. (LOL) I better straighten her out.


I gave her a new dress and wings awhile ago. The dress was a Barbie dress and the wings were the tail of a mermaid. I thought that the tail made perfect wings.


This little elf was handmade for me by a lady that knew my Dad. I don't remember exactly when I received him, but I do know that I was quite little. I have placed this little guy on a Christmas tree every year since then.

Almost all my decorations were made by my family. Such nostalgia as I opened the box and unwrapped them, some tears, but mostly loads of smiles as I placed them on the tree.


When my children were young we would make Christmas ornaments out of salt-dough. It was so much fun and they made great gifts. This little angel is one of Trina's beautiful creations. She loved to make Angels, and I have four of them that I place on the tree each year. You can see that her wonderful talent for creating whimsical figurines was in full force back then too.


Charlie and Michael were more into making cars. (Left is Michaels) Michael was really little at the time so his brother helped him with his and (Right is Charlie's) They do resemble the Match Box Cars that they loved so much. They would play for hours on end with them. They still have their cars stowed away in match box cases after all these years.


My husband Charlie loved crafting and salt-dough was right up his alley. He made this whimsical Ben Franklin that makes me laugh every time I see him. He was always making something and each time he would get into a new project he would call it his (what ever he was doing at the time) phase. Well this was his "Salt Dough Phase". He had the carving phase, the macrame phase, the drawing phase, the bird house making phase just to name a few.


I can't believe I made this ornament. I never feel like Bah Humbug so I'm blaming it on the movie Scrooge, I must have just finished watching it.


One of the things I love to do at Christmas time is going from neighborhood to neighborhood and see all the beautifully decorated homes. Some could be in a magazine and others, well, all I can say is that the decorators have "The Christmas Spirit." It kind of reminds me of when my sons were little. I would give them the tinsel to hang on the tree and they would have fun throwing it at the tree instead. It would wind up in clumps, not the prettiest look, that's for sure. As I write this post I am reminded of what wonderfully fun times we all had together.


I wish you all a Merry Christmas and a Happy New Year

Monday, December 13, 2010

Our December Guild Meeting

My Polymer Clay Guild had its Christmas pot luck yesterday. There were four long tables filled with the most yummy food imaginable. I wish I could have tried every dish, but that would have been an insurmountable feat.

I was looking forward to Sherri Sneed's demonstration on armatures, but unfortunately, she couldn't make the meeting. Babette Cox took her place and demonstrated a Satin Swirl Egg. She used this huge egg for her demonstration, but you can use the more ordinary chicken egg.

The lesson was inspired by Kyle Savastano. His mom had given Kyle (who was only five at the time) scraps of clay while she was demonstrating mica shift covered eggs. He proceeded to mush and smoosh the clay then placed the scraps on an egg. You can read about Kyle and see his incredible egg by clicking on the following link: http://www.polymerclaycentral.com/satinegg.html

The link also has a tutorial on how to make this beautiful egg. I'm anxious to try it myself.

We also had a demonstration by Shelly Traub on "Polymer Clay Menorahs" I thought it was quite ingenious using bolts for the candle holders. They fit the Menorah candles perfectly. Shelly has used this demonstration when teaching children, because it is such a fun and easy project to do.


Our meeting ended with our swap which is always so much fun. I came home with three beautiful clay creations. I love the swirl earrings by Ruth Steiner and the steampunk gingerbread man by Teresa Stites, but was quite awestruck by Cindy Walker's creation of Kellie Mowat's "Singing Angel Ornament" that was featured in this months Polymer Clay Cafe magazine. We have such wonderfully talented artists in our Guild.


\
Lucky Me!!! One of our Guild members bought a used toaster oven (previously used for polymer clay) at a garage sale. She thought someone in the Guild would like it and that lucky someone was me. She only wanted what she paid for it and would you believe it - it was only $10.00. I couldn't wait to get it home and put it in my clay room and as you can see, it fits perfectly in my wicker cabinet. I have to get a temperature gauge for it, which I will buy today, then I will be ready to try it out with my next project.

Tuesday, December 7, 2010

A Great Dip

~ Happy Holidays ~

The December meeting of the North Texas Polymer Clay Guild is this Sunday. We are going to have a Pot Luck and I am going to bring a most delicious Crab Dip. (Recipe below)

There will be short demonstrations on "Armatures for Polymer Clay Art Dolls" by Sherri Sneed and "Polymer Clay Menorahs" by Shelley Traub,. Both ladies are members of our Guild. I am looking forward to the demo on armatures because I am soooo interested in creating those wonderful little Fairies and Elves.


There is a swap and this month it's called "Anything that Hangs" I made little hanging Christmas ornaments. You must make three to be in the swap, so three it was. (I think they look more like cherries, don't you?)


I love seeing what everyone come up with and I love being in the swap, because I get three beautiful clay creations in return. I will post the ones that I receive on my next blog.


~ Merry Christmas and Happy New Year ~

Crab Dip Delight

12 oz package of Crab (Flake Style)
8 oz. package of cream cheese (softened)
1/2 cup of finely chopped green onions
1/2 cup chopped celery
3 tablespoon lemon juice
2 tablespoon chopped parsley
1/2 teaspoon Salt
1/8 teaspoon Cayenne pepper
1/2 cup mayonnaise


I buy the crab-flavored surimi because my daughter in law is highly allergic to the real thing.
(It tastes wonderfully crabby)


Chop the crab into small pieces and set aside


In a bowl, blend cream cheese with onions, celery, lemon juice, parsley, salt, cayenne pepper and mayonnaise. Fold in the crab, mix well, then cover and refrigerate.


Serve this dip with crackers of your choice and enjoy.

Thursday, December 2, 2010

Jewelry making for a Novice

I am a novice at making jewelry so I was pleased to find this video which shows how to make a simple heart pendant and earrings. The demonstrator mentioned using wax paper or parchment paper, but I use freezer paper when creating my pieces because it has a coated backing and it can go in the oven. Not only that, the roll is much wider and is 75 square feet long. (objects to be baked need to be placed on the non-coated side) I cover my work surface with it and cut a small piece like the demonstrator did for underneath my working piece. This makes it easy to turn the piece around while working on it and when finished just place it on your cookie sheet (I use a dedicated cookie sheet) to bake.


I loved how she used another piece of clay to take the heart out of the mold. It doesn't distort the piece at all.


Sunday, November 28, 2010

My Beautiful Neighborhood


What a great city I live in. It was recently ranked the safest city to live in the United States with a population of more than 250,000. What is so incredible about this city is that it doesn't seem that large. Maybe its because the subdivision where I live sits between two farms. One farm has horses and the other has cows and of all things Llamas. The little ones are adorable, so fluffy and happy as they run after their moms in the big field.


There are walking trails throughout the city. Mine has has a beautiful stream running through it and is inodated with beautiful trees, flowering bushes, green grass and loads of squirrels scampering about. 

Motorized vehicles are not allowed, but there are bicyclists, joggers, and people walking their dogs and it is so wonderful just to take a leisurely walk. Nature is in abundance all around me.


My son Charlie's house is directly across from a beautiful little lake teaming with wildlife. Some of the local ducks have taken up residency under a bush right on his property. There are fish of all kinds, nutria, turtles, snakes (not so fun) and  I love watching the white Egrets


as they stand at the water's edge patiently waiting for their meal to arrive (as you can see by the picture at the top of the blog) The Blue Heron is magnificent as he flies across the water and lands so perfectly without hesitation. The funny thing is there are also loads of Sea Gulls and we are not even close to an ocean. Fishing is allowed and on a Sunday afternoon you will see Daddies teaching their little ones to fish.

This rustic bridge is just one of many on the walking trail. As you walk along there are plenty of places to stop and have a picnic, (the city provides picnic tables and grills) and there are numerous playgrounds for the kids with slides and swings.

Yes, my neighborhood is beautiful and as big as Plano is, it is a great place to live.

Friday, November 26, 2010

A Wonderful Addition

While shopping at Michaels this past week, I came across a wonderful addition to my clay room and the fantastic part is, it was 50% off the original price. (final price $24.99) This small cabinet was going to make my life easier. Knowing an approximate measurement of the polymer clay packages, I had a feeling that they would fit perfectly. I quickly stuck it in my cart and raced over to the clay isle and my instincts were right, they would fit perfectly. Now I was anxious to get home and load it up. Oh, how wonderful it is to have that clay at eye level with each color in it's own designated space.


The cabinet has a glass door, which I will never close, (although you could if you wanted to) I came up with an idea to be able to use that side too. I bought that rubberized Grip Liner (I used black) and hot glued it to the edge of the glass, then with Christmas ornament hangers I hung my gripper and cutting tools. The Grip Liner is thick and able to withstand the pressure of the hanging tools with no problem. The cabinet is built to be hung on the wall, but I am going to set it on my table. I will certainly have easy access to them and a little more organized in my clay room.

Sunday, November 21, 2010

The Place where I Clay

Since it is impossible to use the sunroom for clay I decided to convert my spare room into a clay room. Now I do not want to worry my dear friends about a place to stay, the room is completely interchangeable and I love it. I bought a folding table, perfect for all my clay, claying accessories and tools. I also put the futon in there so if Melissa decides to spend the night she will have a place to sleep. My queen mattress and box are encased in plastic and stowed away, but on the ready if I do get out of town guests.

I moved everything off the dining room table (so now we can use it for the holidays) which is wonderful. The table I bought from Walmart is 6 foot long and it was only $39 which I thought was a real bargain. It folds into a 3 foot square and can be easily stowed in the closet. I pushed my two rolling carts in there with my fingers crossed hoping they would fit under it. Wallah, they were just right. Okay, things are looking up. I have a 5 foot bookcase,
an armoire and a wicker cabinet, plus a walk-in closet all of them empty just waiting for me


to place everything. Now, in saying this, I think  will need a list of where I put everything. There is nothing worse than trying to find something and wasting an hour or two trying to find it. After all, I could be claying not doing the hide and seek routine.

This is a picture of my claying area. There are two windows in the room so it is nice and bright. I am very happy with this room and I know I will spend loads of wonderful hours claying my little heart away.

Friday, November 19, 2010

- If Truth be Told -

I found these on the net and wanted to share them with you. Some of them really hit home with me.
- If Truth be Told -
I think part of a best friend's job should be to immediately clear your computer history if you die.

Nothing sucks more than that moment during an argument when you realize you're wrong.
I can't remember the last time I wasn't at least kind of tired. In saying that, I totally take back all those times I didn't want to nap when I was younger.
There is great need for a sarcasm font.
And just how are you supposed to fold a fitted sheet?
Was learning cursive really necessary?
Map Quest really needs to start their directions on #5. I'm pretty sure I know how to get out of my neighborhood.
Bad decisions make good stories.
You never know when it will strike, but there comes a moment at work when you know that you just aren't going to do anything productive for the rest of the day.
Can we all just agree to ignore whatever comes after Blue Ray? I don't want to have to restart my collection...again.
I'm always slightly terrified when I exit out of Word and it asks me if I want to save any changes to my ten-page research paper that I swear I did not make any changes to.
"Do not machine wash or tumble dry" means I will never wash this -- ever.
I hate when I just miss a call by the last ring (Hello? Hello?), but when I immediately call back, it rings nine times and goes to voicemail. What'd you do after I didn't answer? Drop the phone and run away?
I hate leaving my house confident and looking good and then not seeing anyone of importance the entire day. What a waste.
I keep some people's phone numbers in my phone just so I know not to answer when they call.
I think the freezer deserves a light as well..
I disagree with Kay Jewelers. I would bet on any given Friday or Saturday night more kisses begin with Miller Lites than Kay.
I know there are a lot more that could be added. If you think of any let me know and I will happily add them to the list.

Wednesday, November 17, 2010

My New Business Card


I am so thrilled! My son Charlie who is a wonderful photographer and graphic artist created my business cards and I think they turned out beautifully.
I use the purple masked face as my Avatar in my Etsy Shop and I also wanted to have it on my business cards. If anyone would like him to create business cards his e-mail address is Charlieprenzi@gmail.com and to see his wonderful photography his website is: http://charlieprenziphotography.com/

I have my first Craft Sale tomorrow and I will be so pleased to be able to give them out. I was thinking that when I have time, I will create a business card holder out of clay for occasions like this. Something with a purple theme to compliment the cards.
As promised in an earlier blog, here is the the swirl that Nancy Lotzer from our Guild taught us how to create. She
is an absolute genius with her swirled bowls.


We started out small as you can see. This needs a lot of perfecting thats for sure, but I loved knowing how to do it and I am going to work at it so one day I too can make the beautiful bowls Nancy makes.

Tuesday, November 16, 2010

Ground in Clay on Carpet - No Problem


I had gotten some black clay (which was really ground in) on my champagne colored carpet, and thought for sure it wouldn't come out, but low and behold, baby oil to the rescue. After moaning about it for awhile I searched the internet and found a solution to my problem. But after reading it I thought to myself "Sure, baby oil, now my rug will not only have a black stain, but it will be oily too."

Well, being desperate to get the stain out, I bought some baby oil and followed the directions I had gotten from the internet. Was I ever surprised. It came out beautifully.

Here's the Scoop:
Take a stiff brush and brush out as much of the problem area as you can.
Then add a drip of baby oil to the area and let it set for a moment.
With a white cloth rub the area that's affected.
Then brush again.

It might take a couple of applications if there is a large spot of clay. I don't know if it works on all carpets, but it did on mine and I was so thankful.

But now to another tragedy and yes, it involves the baby oil. I had lost the top to the bottle so it sat open on my craft table. (which I'll never do again) A few days after my first incident I accidentally knocked the open bottle of oil over, and it spilled and when I say spilled, it gushed out of the bottle right onto the carpet. My mind was spinning, what could I do. First I took paper towels and blotted up as much as I could, then seeing the baby powder sitting on the craft table, I quickly sprinkled some on (actually a lot) thinking that it would soak up the oil. Well it did, but it took several applications before it was oil free. Lastly, I left a paper towel on the top of it and every once in a while would press on it just to see if any oil bled through and it didn't.

All I can say is Thank God for babies in every way, but especially right now for their oil and powder which came to my rescue.

Monday, November 15, 2010

Tear Drop Blend

Yesterday my Guild had a presentation on Skinner Blends. The Tear Drop Blend was very interesting to me so today I looked it up and found that Cindy Lietz invented this method. It is a far less scientific manner of creating the Skinner Blend. She named it the Tear Drop Blend which is quite appropriate as you can see by the picture.

She hated all the measuring involved and came up with this great way of making this easy blend. She created tear drops in different colors and laid them next to each other in opposite directions giving them the look of triangles

Then she rolled the blend instead of folding and found that it would blend almost ten times faster.


This meant instead of taking ten minutes to make a blend from start to finish, she could do one in under a minute!


She could do tiny little test blends to see if she liked it before committing to a large batch. This to me is so exciting.

Creating a whole rainbow of colors is a snap with this technique. No more figuring out exactly how to cut the right shapes so that they will fit together. No more measuring or cutting at all. Easy and fast.

She coined this modified Skinner Blend technique as the Tear Drop Method.

I am anxious to try it out. It sure would save me time and a lot of frustration and that's always a good thing.

You can visit Cindy's blog and read more about this wonderful tear drop method at:
http://www.beadsandbeading.com/blog/tear-drop-method-polymer-clay-skinner-blend

Saturday, November 13, 2010

My First Bottle of Hope


 Today, I created my first Bottle of Hope and here she is in all her glory. Oops, she has her back turned, I think she is a little shy. Anyway, I had a pretty good idea what I wanted to do, but as usual when I am creating something new, it always seems to turn out differently than I anticipated, but all in all, I am pretty happy with the outcome. Oh, I see you now have a side view of her. Maybe if we are lucky, she will show her face.
Well, here she is with her cute little smile.
I have seen cute and very ingenious looking Bottles of Hope that my Guild members have created, I wish I had some pictures to show you.

Polymer Clay Central has a great article on the 2002 polymer clay Bottles of Hope and some wonderfully creative bottles that were entered into a contest. Here is the link: http://www.polymerclaycentral.com/boh02_winners.html You will love those bottles!

Also, I am giving you this link which tells all about the Bottles of Hope and the woman who began it. http://www.ntpcg.org/boh.aspx

Tomorrow is my Guild meeting and I am looking forward to it. Well, here she is with her little heart filled with hope. It must have spilled over because the bottle was so full. Anyway, back to the Guild Meeting. Our meeting runs from one o'clock to five giving us plenty of time to have our demonstration and then create something of our own. Like I commented in an earlier blog. I am very poor at making swirls and maybe with someone showing me I will be able create one. We will see...

Tips for Sculpting Polymer Clay

I found some wonderful tips for sculpting with polymer clay.

Keep a wet washcloth or wet wipes (baby wipes) on hand to keep you hands clean while sculpting. Any little piece of dirt or pet hair your hands pick up will stick to your sculpt.
Get a lazy susan, it’s a simple thing but it's wonderful to be able to turn your sculpts easily.

Mirrors are your friend. A great way to tell if you have something lopsided is to look at it reversed in a mirror, it really brings out any problems.
Smooth out your polymer clay by brushing it using isopropyl alcohol. 90% will smooth more aggressively than 70%. You can find it in any drug store in the first aid supplies.
Of course a Pasta Machine is a must. It is the perfect tool for mixing clay and rolling out sheets of clay. Mixing clay by hand takes forever and leaves your hands too sore and tired to actually be able to sculpt.
Wet wipes are also useful for keeping our pasta machine clean. Just run one through on the smallest setting a few times until the rollers are clean. If you don’t have wet wipes a piece of folded paper towel sprayed with window cleaner also works quite well.
Make or find your own tools. Sculpting tools can be expensive to buy so whatever you can make or find is great. A few examples are:
  • Knitting needles
  • X-acto knives
  • Paintbrushes
  • Sewing needles can be glued into the end of pieces of dowel (tapestry needles come in the perfect sizes)
  • Steel guitar strings are perfect for homemade loop tools. Just glue a loop of the wire into a hole drilled in the end of a dowel.
  • Dowels can be easily carved with an x-acto knife and fine sandpaper into endless shapes.
  • Anything that has an interesting texture can be made into a stamp. Just press a blob of epoxy putty (such as ApoxieSculpt, milliput, hard setting plumbers epoxy) onto the object you want to make a stamp of. Some examples would be an orange, cantaloupe, bark, etc.
Save your eyes. If you are sculpting a lot of fine detail get a magnifier of some sort.
If your clay isn’t the consistency that you want there are a couple things you can do. If it’s too soft you can leach the clay, roll out thin sheet of the clay, place it between two sheets of white paper, and stack a couple books on top. Leave it there checking the consistency ever couple hours until it reaches the firmness that you want. If the clay is too hard or dry, you can use either sculpey clay softener (previously called diluent) or fimo mix quick to soften the clay.
Bake your clay thoroughly at the temperature indicated on the package. Under-baking can leave your sculpture weak and in some cases it make actually break down due to uncured plasticizers. Ramp bake, this was originated by Katherine Dewey who’s a genius. This means you first bake for 15-20 minutes at 225, 15-20 minutes at 250, then depending on the thickness of the sculpt for between 20 and 60 minutes at 275.

Friday, November 12, 2010

Great Information about Polymer Clay

I found some great information about translucent polymer clay and wanted to share it with you.

Premo Frost #5310 with Bleach and Studio by Sculpey Frost are the clearest of the translucent clays. They are followed by Kato Polyclay, Sculpey III, Premo #5310, Fimo Soft #014, Fimo Classic #00 and lastly Cernit #010 White Translucent.
Pardo Artist is another translucent clay. Ladysaotome from PCC has been experimenting with Pardo trans and Pinata inks and the results are just beautiful.
She also thought that this post that had some translucent experiments would be helpful.
http://www.flickr.com/photos/11boldstreet/sets/72157625207679151/
Premo Translucent and Sculpey III are the most amber colored of the brands. Kato and Fimo clays are the whitest in color.
The tiny circular 'moon' shapes you sometimes see in the layers of translucent clay are caused by a condition called 'plaquing'. Fimo Clay has the most plaquing of all the brands of polymer clay. Kato clay the least. Moisture on your hands and over working the clays will cause more plaquing.
Adding tiny amounts of opaque clay will help to reduce plaquing. Think pea sized amounts with a whole block of clay. White and beige are good candidates for this technique.
Translucent clays start yellowing very easily with heat. Baking directly on a ceramic tile or metal cookie sheet will cause translucent clays to scorch quickly. You can protect the clay either by tenting your pieces while baking or by burying them in a bed of cornstarch. Leigh from PCC also reminded me that we must watch that the temperature isn't too high.
Translucent clay bakes up clearer when layered over raw clay, more so than over baked clay.
All translucent clays can be tinted with alcohol inks. Coat the clay with ink and let dry a minute or two, so the alcohol has time to dissipate. Then mix the clay until you have the look you want. Gloves are a good idea here unless you don't mind colored hands!
Dust your fingers with cornstarch to avoid leaving fingerprints on polymer clay beads.. You can also rub it on raw clay surfaces to remove fingerprints that did end up getting left behind.
Cornstarch makes an excellent release agent for rubber stamps, texture plates, polymer clay molds, etc. Dust lightly on the surface you don't want your clay to stick to. The powder will wash off with water after baking.
Poke your bead piercing wire into some cornstarch before you pierce your beads and you will find it enters the raw clay much easier.
Baking your beads in and under cornstarch is a great way to protect and support fragile beads during baking. A covering layer of cornstarch will also keep the color of your beads brighter and more true. However, don't rest raw beads in cornstarch for too long before baking. The powder may leach some of the plasticizers from the clay and cause weakness.
Mixing things into translucent clay is half the fun. You can mix glitters, colored powders, and other forms of clay. I have even heard of spices being used as coloring agents, which creates a lovely, natural look and smells great while baking. Be careful when using glitters and makeup powders to make sure that everything you're using is safe for use in the oven. Consult labels and your craft store carefully before proceeding.
Sanding and polishing translucent clay gives it amazing depth, and if there are other colors of clay or glitter swirled inside, you can make convincing fax agate, opal and other gemstones - perfect for designing your own jewelry, adding to mosaics or using as decoration.

Monday, November 1, 2010

November Polymer Guild Meeting

Our November Guild Meeting is going to be presenting "Designing Swirl Elements" demonstrated by Nancy Lotzer.


About Nancy Lotzer: After retiring from teaching preschool she found her creative spirit with polymer clay. She has been playing and exploring with this marvelous medium since 2002. She loves mica clays, making vessels and working with any technique that involves tiny, overly intricate details.


She will demo the basic swirl technique and will show examples of how to change things up to make that ultimate swirl element to use in your designs.


I am looking forward to her presentation as I have never gotten the hang of a swirl. Here is an example of what she will be teaching us.


We will be bringing our supplies to the meeting and creating something with a swirl design and I will post mine even if it comes out terrible. So, you will either be feasting your eyes on something beautiful or you will be wondering why I didn't throw it in the round file. Wish me luck.


Sunday, October 31, 2010

Tory Hughes


North Texas Polymer Clay Guild

The September meeting which was my first, featured Tory Hughes. She presented a demo on “Integrating Wire with Polymer, for Functional and Decorative Use”.


Tory has been working with polymer clay since she was 13. In 1992-1994 she actually invented many of the techniques and approaches now in common use everywhere. She has been in business professionally as an artist in galleries and fine craft shows since 1982. Her art is in major museums nationally and private collections worldwide. She has recorded 15 DVD’s, is in six books and she has written two - the newest one “Five Simple Directions”
I 
I must say, her presentation was wonderful and very easy for a novice to understand. This is one of several pieces that she passed around for all to see. One of the methods I found quite interesting was how she actually carved the clay piece once it was cured. I also loved her demonstration on using hinges in her creations. She is not only interesting, but a wonderful talented artist.I am so impressed with our Guild. Even though we meet only once a month, I am inundated with all kinds of wonderful e-mails, from seeing what other Guild members are doing with their clay to receiving some wonderful coupons.
I received this color test, which I thought would be a snap. I worked and reworked the hues until I thought they were perfect. Ha! Not so perfect! Actually, I was a failure at it, well not exactly a failure, but I thought I was right on. Try your eyes at it and see how well you do
http://www.xrite.com/custom_page.aspx?PageID=77

Wednesday, October 27, 2010

Steampunkery


I have discovered the world of Steampunkery and I love it. I know it's been around quite a while, but it's new to me. It's so much fun searching in the craft and hardware stores for metal findings and discovering something cool to embed into the creation you are making.


I belong to the North Texas Polymer Clay Guild and they have a huge selection of library books that you can check out . Well, I found a book called Steampunkery by Christi Friesen and it's fabulous. I have a long way to go before I get to her level, but I'm working on it. I have a few items in my Etsy Shop and plan on doing many more.

As a matter of fact I just returned from the hardware store where I purchased some wing nuts, lock washers, nut caps, phillips flat head screws, black carpet tacks and some upholstery nails. I perused the hardware isle and found the smallest size available. I think they are going to look terrific adorning my new pieces.

What is Steampunkery, you might ask. To quote Christi: "Steampunk is a look-a sort of Victorian-era mad scientist-adventurer kind of look. You will see a lot of clockwork gears, brassy bits, leathery straps, beads and even the occasional bit of lacy filigree" I must say, I find it quite fascinating.
  

Right now, I am busy getting an array of items made for a craft sale that will be held in November. It's my first craft sale and looking forward to it. My son Charlie is also going to have a booth there. He is a fabulous photographer as you can see by the pictures he takes. His website is: http://charlieprenziphotography.com/.

I hope your day is wonderful and full of sunshine even if it's cloudy outside.

Monday, October 25, 2010

An Etsy Shop

For all of you that want to have your creations shown to a wide audience and some sales under your belt, Etsy is the way to go. I started my Etsy Shop because my daughter was such a wonderful clay artist and she hesitated on getting one. Well, the hesitation was gone once she saw my shop up and running and she is having a ball with it. Her shop is delightful. She specializes in cake toppers, but she has so many other wonderful items from boxes to vases. This is a picture of a special order cake topper she created for a grooms cake. She was given a picture of the items and she duplicated them in her own artistic way. The Bride to be was ecstatic over them.


Even though she is in Michigan and I am in Texas, we have been having so much fun together  We joined Polymer Clay Central on the same day and have had loads of visitors to our blogs and Etsy Shops.  This picture was taken in Michigan when I was visiting there.
You can visit Trina's Etsy Shop at:  http://www.etsy.com/shop/trinasclaycreations


An Etsy Shop is easy to open and the cost factor is minimal. Other venues have you pay a monthly fee, but Etsy makes 20 cents an item and a small percentage of the sale. It sounds like I'm an advertisement for Etsy and I guess I am in a way, but its fun and exciting to see your creations being displayed with many talented artisans. This is one of my masked faces. As you can tell by my blog, I love purple. Not all my masks are purple though as you can see when you visit my Etsy Shop at: http://www.etsy.com/shop/mstp

Friday, October 22, 2010

Another Use for Gauze

October's North Texas Polymer Clay Meeting


I had a list of things a mile long that I needed to take with me to the meeting and I knew that I couldn't fit them all in a plastic bag, so off I went to Michaels with my 40% off coupon in hand and bought this huge traveling craft bag.I thought it would be too big, but how mistaken I was, as it turned out it was just the right size.


I had a whole hour before the meeting was to start, plenty of time even though this particular meeting wasn't at it's usual place. I took my time packing and when I began zipping the bag up I noticed that the zipper was broken. Okay, don't panic, I said to myself, Michaels is only a hop away. I quickly emptied the case, grabbed my keys and off I went.


Rushing into the store I quickly explained my problem to the overly zealous clerk. She smiled and explained that she was a whiz at fixing zippers and would have it fixed ASAP. Well, I didn't have ASAP, but I patiently waited and soon she realized she wasn't the whiz she thought she was and told me to go and get another. I raced across the store with a speed I didn't know I possessed. With a new case in tow, I thanked her as I raced out the door. I'm sure some of the patrons must have thought I was a thief.


I finally made it back home, but time was dwindling. I quickly packed my bag and out the door I went.


All I can say is WOW! Lynda Evans (who is a member of the Guild) presented a demo on her "Liquid Clay Gauze Bracelets" I had no idea that medical gauze could magically transform into something of beauty. The only time I ever used it was when one of my kids needed it for an injury and that was never a pretty sight.


I love how organized this group is. There were more than 40 people there and everyone had a birds-eye view, because it is videoed on a large screen. After Lynda's presentation, we went back to our tables and proceeded to made our own bracelets. Rubber gloves were one of the items on the list and I could see why. If I didn't have them my nails would have been green, although with Halloween coming round the bend the look would have been quite appropriate.


Anyway, back to the bracelet. I know that I could have done a lot more with mine. Especially after seeing the amazing work that some of the ladies were doing, I really felt mine paled in comparison, but here it is in all its glory for you to see. I am going to make more of them, because they are so much fun to make.


The meeting ended with a Halloween swap. It was so much fun! I made this little pumpkin pie with a pumpkin and black cat decorating the top. I can't wait to find out what the theme is for next month.

Wednesday, October 20, 2010

My Masked Faces

I have been creating masked faces since the spring of 2010. I was inspired by them since visiting Venice and seeing so many beautiful masks in the shops.


This particular one is a favorite of mine. Notice the Lizard emblem on the headdress. In Roman mythology the lizard was thought to sleep throughout the winter and thus came to symbolize death and resurrection.


I have this creation for sale in my Etsy Shop. It is approximately 9" tall by 4.5" wide and comes mounted on a 13" by 7.75" black frame.


I have many items in my shop other than my masked faces, all created with polymer clay. You can view them and more of my masked faces in my Etsy shop, just press the link to the right below my guest book which goes straight to my Shop or you can view the slide show that's posted here.

My Home Studio

I was thrilled to be able to convert my sun room into a studio where I could let my creativity run free. With the anticipation of knowing that I would love sitting at my craft table looking at the beautiful and expansive view of my cute little back yard, I couldn't wait to get started. But... life doesn't always turn out like you plan it, and now I am stuck at the dining room table because my sun room is steamy, to say the least, due to that humid and hot weather here in Texas. (Raw polymer clay does not do well in this environment, nor do I!) I only have to wait until the end of October, but of course, I remember plenty of Decembers that were pretty hot too. I'll just have to wait and see what the weatherman has in store.